Western Blot Protocol
Western Blot Introduction
Western blotting uses antibodies to identify individual proteins within a cell or tissue lysate. Antibodies bind to highly specific sequences of amino acids, known as epitopes. Because amino acid sequences vary from protein to protein, western blotting analysis can be used to identify and quantify a single protein in a lysate that contains thousands of different proteins. First, proteins are separated from each other based on their size by SDS-PAGE gel electrophoresis. The proteins are then transferred from the gel to a membrane by application of an electrical current. The membrane can then be processed with primary antibodies specific for target proteins of interest. Next, secondary antibodies bound to enzymes are applied and finally a substrate that reacts with the secondary antibody-bound enzyme is added for detection of the antibody/protein complex.
Contents
Cell Lysate Preparation from Adherent Cells
- Wash cell culture dish on ice with ice-cold PBS.
Aspirate PBS and add ice-cold lysis buffer (1 mL per confluent 107 cells/100mm dish/150 cm2 flask). See the table below for lysis buffer recommendations based on the subcellular location of the protein of interest
Subcellular Location Recommended Buffer Whole cell lysate NP-40 Nucleus RIPA Mitochondria RIPA Cytoplasm Tris-HCl Membrane-bound Protein RIPA - Using a cell scrapper, scrape adherent cells off the dish and transfer the cell suspension into a microcentrifuge tube. If required, the cells can be trypsinized and washed with PBS prior to resuspension in lysis buffer.
- Agitate the cells for 30 minutes at 4 °C.
- Centrifuge the cell lysate mixture at 4 °C.
- Transfer the supernatant (lysate) to a fresh tube on ice.
Note: The time and centrifugation force vary for each cell type, but a general guideline is 20 minutes at 12,000 rpm.
Sample Preparation
- Determine the protein concentration of each cell lysate.
- Determine how much protein to load (Recommended: 10-50 µg/lane) and add an equal volume of 2X Laemmli buffer.
- Reduce and denature the samples by boiling the lysates in Laemmli Buffer at 95-100 °C for 5 minutes.
Note: This step should only be skipped if the antibody datasheet recommends non-reducing or non-denaturing conditions.
SDS-PAGE Gel Electrophoresis
| Protein Size | Gel Percentage |
|---|---|
| 4-40 kDa | 20% |
| 12-45 kDa | 15% |
| 10-70 kDa | 12.50% |
| 15-100 kDa | 10% |
| 25-100 kDa | 8% |
| >200 kDa | 4 - 6% |
- Prepare or purchase a pre-made gel of appropriate polyacrylamide percentage to best resolve your protein of interest based on molecular weight.
- Load samples containing equal amounts of protein (10-50 µg/lane protein from cell lysate or 10-100 ng/lane purified protein) prepared in sample buffer into SDS-PAGE wells. Include a molecular weight marker in one of the lanes.
- Fill the electrophoresis apparatus with 1X running buffer as instructed by the manufacturer.
- Run the gel as recommended by the manufacturer.
Note: 1-2 hours at 100V is standard, but time and voltage may require optimization.
Protein Transfer
Prepare PVDF membrane by wetting it in methanol for 30 seconds and then soaking it briefly in distilled water followed by 1X transfer buffer. Handle the membrane carefully, ideally with rounded tweezers to avoid scratching or puncturing the surface.
Note: PVDF membrane must be wetted in methanol, but methanol-free transfer buffer can be used. DO NOT wet nitrocellulose membranes with methanol or the membrane will dissolve.
Note: PVDF membrane has a higher binding capacity, best for low expressed proteins, but nitrocellulose membrane is ideal for lower molecular weight proteins.
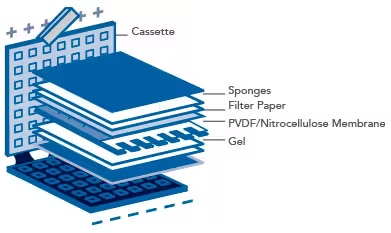
- Soak filter papers and sponges in 1X Transfer Buffer for 10 minutes prior to assembly of the transfer “sandwich”.
- After electrophoresis, remove the gel from the electrophoresis apparatus and equilibrate it by soaking in 1X Transfer Buffer for 10 minutes.
Prepare the transfer sandwich according to the illustration below. Sequentially assemble the layers of the sandwich. Gently remove any air bubbles with a roller or pipette. Bubbles between the gel and the membrane will inhibit the transfer of proteins to the membrane.
Note: Transfer time/voltage may require optimization. Over-transferring (or pulling protein all the way through the membrane) can occur and thus caution must be taken, especially for small proteins.
- Place the sandwich into a transfer cassette and perform semi-dry or wet transfer according to the manufacturer’s instructions of the blotting apparatus.
- Semi-dry transfer: Generally faster, better suited for larger proteins > 100 kDa. Commonly used transfer time: 1 hour at a constant current (1.25mA/cm2).
Wet transfer: Recommended for smaller proteins, especially proteins < 30 kDa. Commonly used transfer time: 1 hour at 100V at 4 °C.
Immunoblotting
After transfer, rinse the membrane briefly in distilled water or 1X TBST.
Note: Do not let the membrane dry at any point during the blotting process.
- Gently mark the molecular weight ladder bands with a pencil for size detection.
- If desired, confirm that the protein transfer was successful by staining the membrane with Ponceau S (a reversible protein stain; Catalog # 5225) for 30 seconds to visualize the protein bands. Rinsing the membrane briefly with distilled water after Ponceau S staining will reveal protein bands. Wash away Ponceau S with several washes in 1X TBST until the membrane is clear. Additionally, Coomassie Blue staining of the gel after transfer can help determine the quality of the protein transfer from the gel to the membrane.
- Incubate the membrane in Blocking Solution for 1 hour at room temperature or overnight at 4 °C with constant rocking.
- (Optional): Rinse the membrane for 5 minutes in 1X TBST, with constant rocking.
To make the Primary Antibody Solution, dilute the primary antibody to a working concentration in 1X TBST with 1% milk or BSA (remain consistent with the Blocking Solution).
Note: Typical working antibody dilutions range from 1:500 to 1:5000. Antibody specification sheets often contain suggested dilutions, but optimal dilutions should be determined by titration. See the troubleshooting section of this guide for more detail.
Incubate the membrane in Primary Antibody Solution for 1 hour at room temperature or overnight at 4 °C with gentle rocking.
Note: This time may require optimization. In most cases, overnight incubation at 4 °C increases signal strength and reduces background signal relative to 1 hour incubation at room temperature.
- Wash the membrane with 1X TBST three times for 10 minutes each with gentle rocking.
Incubate the membrane in the appropriate diluted secondary antibody (in 1X TBST and may include 1% milk or BSA) for 1 hour at room temperature with gentle rocking.
Note: See primary antibody information sheet for proper secondary antibody selection. The secondary antibody must recognize the host species of the primary antibody. Secondary antibody concentration guidelines are listed in the product information sheet.
- Wash the membrane in 1X TBST three times for 10 minutes each with gentle rocking.
Detection (Chemiluminescence)
- Prepare the ECL substrate according to the manufacturers’ instructions just prior to use.
Incubate the membrane in the ECL Reagent according the manufacturers’ instructions. Typical incubation times are 1-5 minutes.
Note: More sensitive substrates may require shorter incubation times, or dilution, to achieve optimal signal and avoid overexposure.
- Carefully remove the membrane from the ECL Reagent and sandwich it between layers of plastic (i.e. a sheet protector or plastic wrap) and ensure no bubbles form between the membrane and the plastic.
Expose the membrane to autoradiography film in a dark room or image with a chemiluminescent imaging system, such as a ChemiDoc.
Note: Click the top right corner of the film as a guide for film orientation in the dark room.
Note: Use multiple exposure lengths to identify the most optimal exposure time.
The developed film or image can be lined up in the correct orientation over the blot in order to mark the molecular weight ladder positions.
Note: The membrane blot may be stripped and reprobed as needed.
Buffers and Reagents
Lysis Buffers | ||
NP-40150 mM NaCl | RIPA150 mM NaCl | Tris-HCl20 mM Tris-HCl, pH 7.5 |
Other Buffers and Solutions | ||
1X PBS137 mM NaCl | Loading Buffer (2X Laemmli Buffer)4% SDS | 1X Running Buffer25 mM Tris Base |
1X Transfer Buffer (Wet)25 mM Tris Base | 1X Transfer Buffer (Semi-Dry)48 mM Tris Base | 1X TBST20 mM Tris Base |
Blocking Solution1X TBST | Stripping Solution # 1 (Stripping With Acid pH)25 mM Glycine-HCl | Stripping Solution # 2 (Stripping With Heat and Detergent)100 mM b-Mercaptoethanol |
Western Blot Data Example

Detection of Human Caspase-1 by Western Blot. Cell lysates from the THP-1 human acute monocytic leukemia cell line and the A431 human epithelial carcinoma cell line were separated by SDS-PAGE and transferred to a PVDF membrane. The PVDF membrane was probed with 2 µg/mL of a Mouse Anti-Human Caspase-1 Monoclonal Antibody (Catalog # MAB62153) followed by an HRP-conjugated Anti-Mouse IgG Secondary Antibody (Catalog # HAF018). A specific band for Caspase-1 was detected at approximately 48 kDa (as indicated). The experiment was conducted under reducing conditions.
Additional Western Blot Resources
Simple Western™ Automated Western Blots
Simplify your Western blot analysis with gel-free, hands-free Simple Western instruments from ProteinSimple, a Bio-Techne brand. Simple Western automates the separation and detection steps of traditional Western blots inside a capillary and gives you fully quantitative, reproducible results with only 3 µL of sample in just 3 hours.